|
|
- Product Guide
- Turning Tools
- Turning Inserts
- Wiper Insert
WIPER INSERT
What is a Wiper Insert?

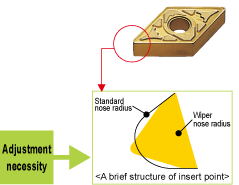
- The wiper insert is designed with a short, flat edge that is located where the straight edge meets the corner radius.
- In comparison to conventional breakers, the surface finish does not deteriorate even if the feed rate is doubled.
- Machining at high feed rates improves cutting efficiency.
Improving Finished Surface Roughness
- Under the same machining conditions against conventional breakers, but with the feed rate increased, the surface finish of the workpiece can be improved.
Improving Efficiency
- High feed rates not only shortened machining times but employing a wiper also makes it possible to combine roughing and finishing operations.
Increased Tool life
- When wiper inserts are employed, the high feed rate possible reduces the time in cut therefore, delaying the progression of wear and increasing insert tool life.
Improving Chip Control
- Under high feed conditions, the chips generated become thicker and are more easily broken, thus, chip control is improved.
| Wiper insert + High feed (The feed rate is doubled.) |
Finished surface Same surface roughness = |
Standard insert + The conventional feed condition |
*Wiper inserts allow high feed rates.
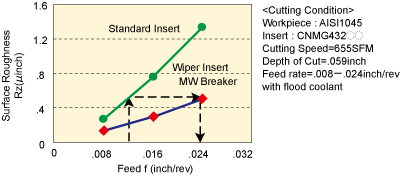
<Eg>The surface roughness does not deteriorate even when the feed rate is doubled (.012→.024) !
Wiper insert + machining at high feed rates
- Reduced machining time
- Increased production rate
- Improved chip control
Wiper insert + machining at conventional feed rates
-
Eliminating the finishing step
(Combine roughing and finishing into single pass.)
- Reducing cost
- Increased productivity
- Reduced machine down time
<Real cost reduction!!>
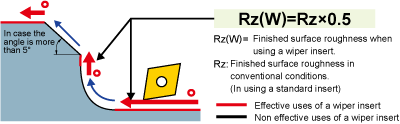
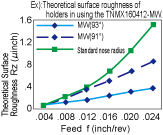
The Estimation of finished surface roughness when using a wiper insert
Wiper effects on external machining, boring and facing.
*The surface roughness when machining at corner R or taper angle over 5°, is same quality as machining when the standard inserts.
Special attention is not necessary when using CNMG • WNMG • CCMT types
No Restriction for Holder
The standard holder can be used as it is. (*The double clamp, high rigidity holder is recommended.)

No machining program adjustment necessary
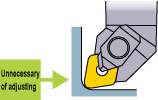 The conventional machining program can be used as it is.
 (The CNMG • WNMG • CCMT types are based on ISO/ANSI standards.)
Special attention is necessary when using DNMX • TNMX types due to the special top face geometry
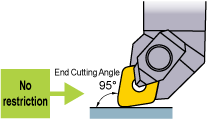
Restriction for Holder
Use a holder with an end cutting angle of 93°to improve wiper efficiency. A holder with a cutting edge angle of 91° can marginally improve wiper efficiency (see the figure below), however, there is no wiper efficiency with other end cutting angles (60°, 90°, 107°etc.).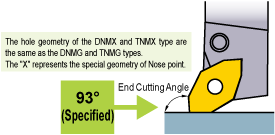
Necessary Adjustment of the Machining Program
If dimensional errors occur, please adjust machining program to compensate for insert nose configuration.(The DNMX • TNMX types are not based on the ISO/ANSI. Please refer to the next page.)
MACHINING PROGRAM ADJUSTMENTS FOR DNMX AND TNMX INSERTS
A)Turning and facing
 |
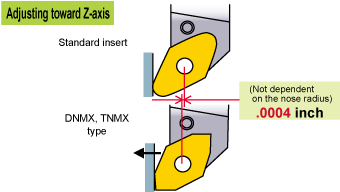 |
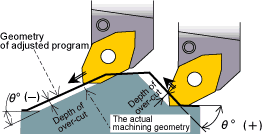
B) Machining a form or taper
Required to machine an accurate form or taper. Move the tool perpendicular to the machined surface.
- (Note)
- Adjust the drive-in angle toward the normal line when the part where the adjust number in minus (θ=60°-70°) is not machined completely.
Classification
| Nose Radius |
Taper Angle θ° | |||||||||||||||
|---|---|---|---|---|---|---|---|---|---|---|---|---|---|---|---|---|
| -25--15 | -10 | -5 | 0 | 5 | 10 | 15 | 20-35 | 40 | 45 | 50 | 55 | 60-65 | 70 | 75-85 | 90 | |
| .047 | .0016 | .0012 | .0004 | 0 | .0008 | .0012 | .0016 | .0020 | .0016 | .0016 | .0008 | .0004 | -.0004 | 0 | .0004 | 0 |
| .031 | .0012 | .0008 | .0004 | 0 | .0004 | .0008 | .0012 | .0016 | .0012 | .0012 | .0008 | 0 | -.0004 | 0 | .0004 | 0 |
| .016 | .0008 | .0004 | .0004 | 0 | .0004 | .0004 | .0008 | .0008 | .0008 | .0004 | .0004 | 0 | -.0004 | -.0004 | 0 | 0 |
Values→+numbers:adjustment of relief angle, -numbers:adjustment of plunge in angle (inch)
C) Compensation when machining a corner radius
1)Tool path adjustment method
Machine the correct form by altering the tool path corner radius. Programmed corner radius = Part print (P/P) corner radius + compensation factor.
| Nose radius | Programmed corner radius |
|---|---|
| .016 | P/P + .0020" |
| .031 | P/P + .0043" |
| .047 | P/P + .0055" |
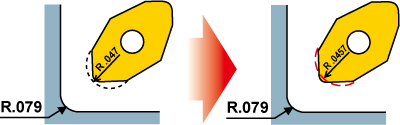
2)Nose radius adjustment method
Machine the correct form by altering the insert nose radius value in the machine program.It is not necessary to alter the tool path when using this method however, a dimensional error of up to +/- .0012" may occur.
| Nose radius | Adjusted nose radius value |
|---|---|
| .016 | .0142" |
| .031 | .0229" |
| .047 | .0457" |
Ex): In the case of machining a corner with a radius R .079 when using an insert with a nose radius R .047.

Ex): In the case of machining a corner with a radius R .079 when using an insert with a nose radius R .047.
- Note)
- The correction value is the same for both DNMX and TNMX inserts. Discriminate between then only by the different nose radius.