
|
|
- Product Guide
- Turning Tools
- Turning Inserts
- Wiper Insert
WIPER INSERT
What is a Wiper Insert?

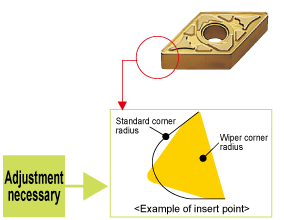
- The wiper insert is designed with a wiper edge that is situated where the straight edge meets the corner radius.
- In comparison to conventional breakers, the surface finish does not deteriorate even if the feed rate is doubled.
- Machining at high feed rates improves cutting efficiency.
Improving Surface Finish
- Under the same machining conditions as conventional breakers, but with the feed rate increased, the surface finish of the workpiece can be improved.
Improving Efficiency
- High feed rates not only shorten machining times but also make it possible to combine roughing and finishing operations.
Increased Tool Life
- When using to high feed conditions, the time required to cut one component is decreased, thus more parts can be machined with each insert. In addition, the high feed rate prevents rubbing, therefore, delaying the progression of wear and increasing the tool life of the insert.
Improving Chip Control
- Under high feed conditions, the chips generated become thicker and are more easily broken, thus, chip control is improved.
| Wiper insert + High feed (The feed rate is doubled.) |
Finished surface Same surface roughness = |
Standard insert + The conventional feed condition |
*Please use a wiper insert at high feed rate.
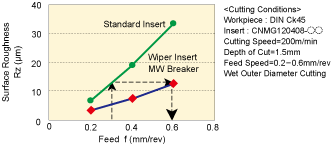
<Ex>The surface roughness does not deteriorate even if the feed rate is doubled (0.3→0.6)!
A wiper insert + machining at high feed rate
- Reduced machining time (per workpieces)
- Increased number of workpieces (per definitive time period)
- Improving chip control
A wiper insert + machining at conventional feed rate
-
Eliminating the finishing step by roughing and finishing together
(Separate roughing and finishing steps ›› Single-step machining)
- Reducing cycle times
- Increased productivity
- Avoiding Line-Stoppage
<The realisation of Reduced Costs!!>
The estimate of finished surface roughness when using a wiper insert
The effects of wiper inserts on external machining, boring and facing.
*The surface roughness when machining at corner R or taper angle over 5°, is the same as machining with standard inserts.

Special attention is not necessary when using CNMG • WNMG • CCMT types
No Restriction for Holders
A standard holder can be used.(*A double clamp, high rigidity tool is recommended.)
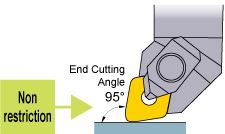
Not Necessary to Adjust the Machining Programme
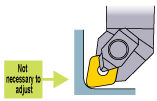 Conventional machining programmes can be used.(The CNMG • WNMG • CCMT types are based on the ISO/ANSI.)
Special attention is necessary when using the DNMX • TNMX types due to the special top face geometry
Restriction for Holders
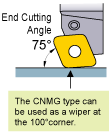
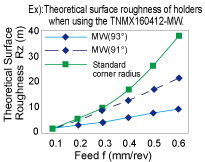
Use a holder with an end cutting angle of 93° for improving wiper efficiency. A holder with an end cutting angle of 91 ° can improve wiper efficiency (see the following figure), however, there is no wiper efficiency with other end cutting angles (60°, 90°, 107°etc.).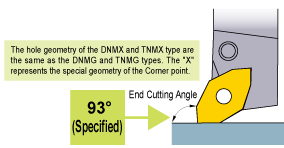
Necessary to Adjust the Machining Programme
When machining errors occur, please adjust the programme.(The DNMX•TNMX types are not based on the ISO/ANSI. Please refer to the next page.)
Adjustment of machining programmes for DNMX • TNMX types
Basic Process) Adjusting Toward X-axis and Z-axis
Adjusting the differential between a
standard insert and Z-axis / X-axis.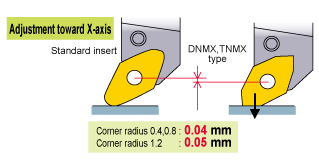
standard insert and Z-axis / X-axis.

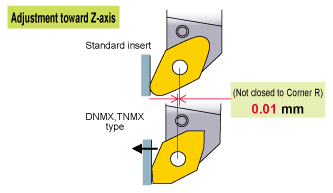
A) Adjusting a Taper *Necessary to maintain a correct taper
Adjust the relief angle toward the normal line.
- (Note)
- Adjust the angle toward the normal line in the case where the adjustment number is minus (θ60°-70°) and is not machined completely
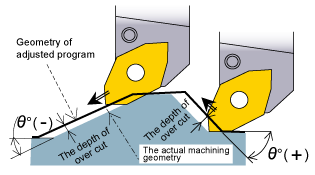
Classification
| Corner radius | Taper Angle θ° | |||||||||||||||
|---|---|---|---|---|---|---|---|---|---|---|---|---|---|---|---|---|
| -25--15 | -10 | -5 | 0 | 5 | 10 | 15 | 20-35 | 40 | 45 | 50 | 55 | 60-65 | 70 | 75-85 | 90 | |
| 1.2 | 0.04 | 0.03 | 0.01 | 0 | 0.02 | 0.03 | 0.04 | 0.05 | 0.04 | 0.04 | 0.02 | 0.01 | -0.01 | 0 | 0.01 | 0 |
| 0.8 | 0.03 | 0.02 | 0.01 | 0 | 0.01 | 0.02 | 0.03 | 0.04 | 0.03 | 0.03 | 0.02 | 0 | -0.01 | 0 | 0.01 | 0 |
| 0.4 | 0.02 | 0.01 | 0.01 | 0 | 0.01 | 0.01 | 0.02 | 0.02 | 0.02 | 0.01 | 0.01 | 0 | -0.01 | -0.01 | 0 | 0 |
The number→+numbers:adjustment of relief angle, –numbers:adjustment of drive-in angle (mm)
B) Adjusting a Corner R *Necessary to maintain a correct corner radius.
Adjust the work diameter to the same as the taper to prevent over-cut.
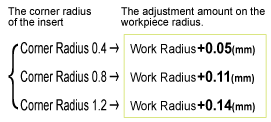
The value of adjustment to workpiece R = Workpiece R + the adjustment value
*No adjusting of the corner radius in this case.
*No adjusting of the corner radius in this case.

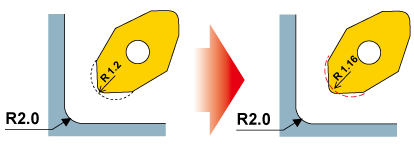
Ex): In case of machining R 2.0 when using a corner R 1.2 type insert.
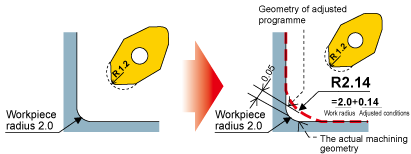
The Easy-to-correct Method
In correcting corner radius:
It is not necessary to adjust the machining programme, however, machining errors can occur within max. ±0.03mm due to correcting by an approximate number.
Corner Radius Correction Input the correction number of each corner radius.
It is not necessary to adjust the machining programme, however, machining errors can occur within max. ±0.03mm due to correcting by an approximate number.
Corner Radius Correction Input the correction number of each corner radius.
The value of adjustment to workpiece R = Workpiece R + the adjustment value
*No adjusting of the corner radius in this case.
*No adjusting of the corner radius in this case.
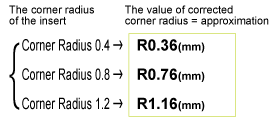
Ex): In case of machining R 2.0 when using a corner R 1.2 type insert.
- Others)
- The value of correction is same for both DNMX and TNMX. Discriminate them by the size of corner radius.